
As always, I am so grateful to you all for your support and I just want to thank you for your lovely notes and for sharing photos of the things you've been making using my patterns - they truly do brighten up my day!!
Because this is my first blog post of the year, I thought I'd begin by surprising you with a sweet little gift - a free pattern tutorial to make a little Bunny in a Blanket!

These tiny bunnies are easy and fun to make and they're the perfect
size (just a smidgen over 3 inches tall) to tuck into
an empty mint tin to take along on adventures! In fact, my 10 year old niece, Amy, was recently over for an afternoon and we made a pair together!

Here's what you'll need to make one Baby Bunny:
✼Sewing supplies such as embroidery scissors, dressmaker's scissors, pins, needles
✼Sewing machine and thread to match fabric for blanket
✼Embroidery thread/floss
✼Disappearing ink marker and ruler
✼Stuffing tool such as an orange stick or chopstick
✼Polyfil
✼Pink and Blue coloured pencils
✼Tiny pompom for tail
✼3.5x3.5 inch light pink or blue fabric for blanket (lightweight fabric such as lawn)
✼3.5x3.5 inch white flannelette fabric for blanket
✼Optional:
- Empty mint tin such an Altoids or Barkley's mint tin
- 2x4 inch white felt for pillow

Please read through all instructions first before beginning this project.
Please Note:
☛Cut out pattern pieces. Pin paper pattern pieces directly onto the felt and carefully cut around pieces for the Head and Body, and, if you're making a bed for your bunny, cut out the Pillow pieces.
☛I've used one strand of embroidery thread/floss to
sew up all felt seams and to embroider the facial features, arms and legs and floral detail on the pillow. Keep your stitches small, neat and evenly spaced.
Head
: To mark the grid on the bunny's Head, keep the pattern pieces pinned in place and gently lift the outer edges, using your disappearing ink marker to mark the beginning of the lines onto the felt. Then remove the pattern piece and use the ruler to connect the lines. This grid will help with the placement of the facial features.
: Using the Head pattern piece as a guide, transfer the facial markings onto the front head felt piece with your disappearing ink marker.
: Embroider the eyes onto the face using black embroidery thread. Begin by making one straight stitch (place it on a slight upward slant, beginning at the inner corner of the eye and ending at the outer corner of the eye), then make another one directly below it, again, beginning the stitch right at the inner corner and ending a couple of millimeters before the end of the top stitch. This will give the appearance that it is slightly wider at the inner corner and more pointy at the outer corner. Make another tiny stitch directly below the top stitch, this time beginning it right at the inner corner and angling it slightly downwards. Repeat for the other eye.
: Make a tiny 'v' for the snout with black thread. Then switch to pink embroidery thread and embroider the lower line for the snout. Embroider tiny whiskers on the cheeks and in the lower ears.

: Place head front onto head back, wrong sides together and pin. Starting at the dot just below the right ear, whip stitch all the away around both ears, stopping when you reach the indent at the bottom of the left ear.
: Carefully stuff each ear using your orange stick to gently guide the stuffing up and into the tips of the ears and then filling up the rest of each ear.

: Continue whip stitching around the bunny's head, working around to the lower dot on the right hand side.
: Stuff face and whip stitch the opening closed adding more stuffing to round out the area as you go.

Body
: Follow the directions above for marking the grid onto the bunny's front Body.
: Using the Body pattern piece as a guide, transfer the markings for the little arms and legs and tiny belly button onto the front Body felt piece with your disappearing ink marker.
: Using a tiny running stitch, outline the arms and legs (I used pink thread for the little girl bunny and blue for the boy), then stitch a tiny 'x' for the belly button.

: Place front body onto back body, wrong sides together and pin. Starting at the dot on the bottom right, whip stitch all the way around the body to the dot on the opposite side.
: Stuff body firmly and whip stitch opening closed, adding more stuffing to round out the bottom if needed.

: Use your coloured pencils to colour in the arms and legs (I've used pink for the girl and blue for the boy). Layer the colour on lightly as too much friction may cause the felt to become fuzzy. Gently swirl the pink coloured pencil onto the cheeks and inner ears.

Attaching Head to Body
: Position head onto the top area of the body. Pin in place.
: Turn the bunny around so that the back of the body is facing you. Insert a threaded needle just below the top seam of the neck and out through the top right hand corner of the neck.
: Working clockwise around the head, ladder stitch the head onto the body, keeping your stitches neat and small. Repeat a couple of times to secure head onto the body.

: Position a tiny pompom onto the lower area of the Bunny's back body. Pin in place. (a.)
: Insert a threaded needle up through the lower seam (this will hide the knot) and out through the center of the pompom. (b.)
: Take a tiny stitch, inserting the needle back in through the pompom and out through the bottom seam. Repeat a few times to secure tail in place. (c.)

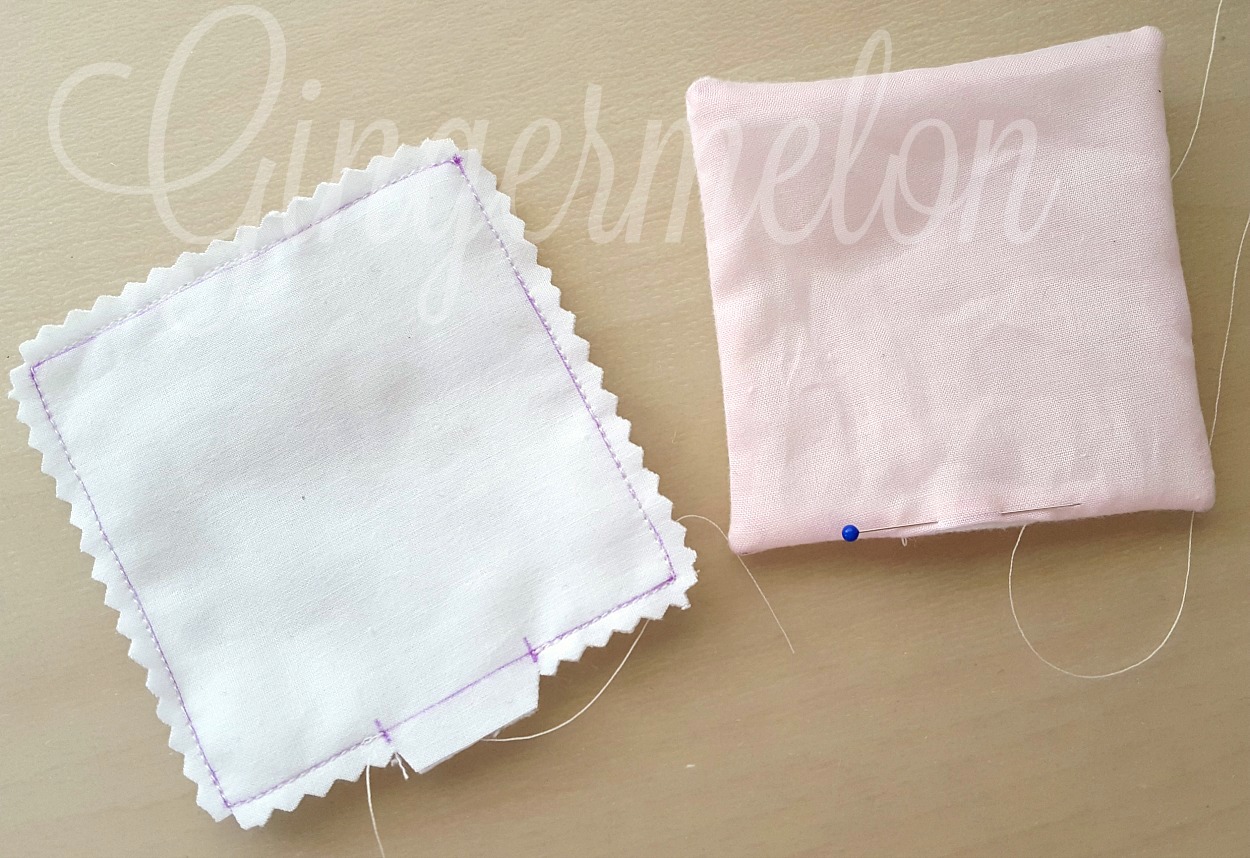
: To prepare the blanket for sewing, position the Blanket pattern piece onto the center of the wrong side of on of the fabric pieces and trace the outline onto the fabric, making sure to mark the dots for the opening. Pin front and back of blanket together, right sides facing.

: Place fabric onto the bed of the sewing machine, aligning the needle perfectly with teh edge of the traced outline just below the dot on the left hand side of the opening.
: Sew directly onto marked line, beginning and ending your seam with a back stitch and leaving a long tail of thread for sewing up the opening.
: Trim excess fabric around edges, leaving a little tab between the dots. Turn right side out and press.
: Tuck tab in, pinning the two sides together. Ladder stitch closed.
: With flannelette side facing up, position blanket in a diamond shape on your work surface.
: Place bunny in center, aligning the tips of the ears with the top point of the blanket. Fold bottom tip up to cover bunny's body. (a.)
: Fold right side of blanket over the front of the body, folding the top edge over (this will expose the flannelette) so that the folded edge of the blanket curves around the bunny's face and under the chin. Pin in place for now. (b.)
: Repeat step (b.) for the left side of the blanket, removing the pin as you wrap the side around at the front. Pin in place. (c.)


✼Optional: Bunny Bed
You can now prepare a little bed for your bunny by using an empty mint tin such as Altoids or Barkley's Mints, or similar. Make sure the tin is clean and dry before you begin.
: To make the pillow, embroider a tiny flower and a few leaves onto the bottom corner of the front pillow piece.
: Place front onto back and blanket stitch all the way around, leaving an opening at the bottom. Stuff and blanket stitch opening closed.

Position pillow into the tin and tuck the little bunny/ies into bed. Two will fit in perfectly side by side.

Aren't they just the cutest??!! I just want to squeal every time I look at them!! :)
I hope you'll have fun making them and I'd love to see how they turn out! Please feel free to post your pics of them on Instagram - you can tag me with the hashtag #Gingermelon, or share some pics on my Facebook page. You're welcome to sell your little creations, I just ask that you offer
GINGERMELON design credit in any written description please.
Please be sure to visit my blog again soon as I'm almost ready to release another pattern I've been working on! Here's a sneak peek..

Happy sewing everyone!!


